-
C# 윈폼 컨트롤(2020.06.16)C# 2020. 6. 16. 11:50
버튼
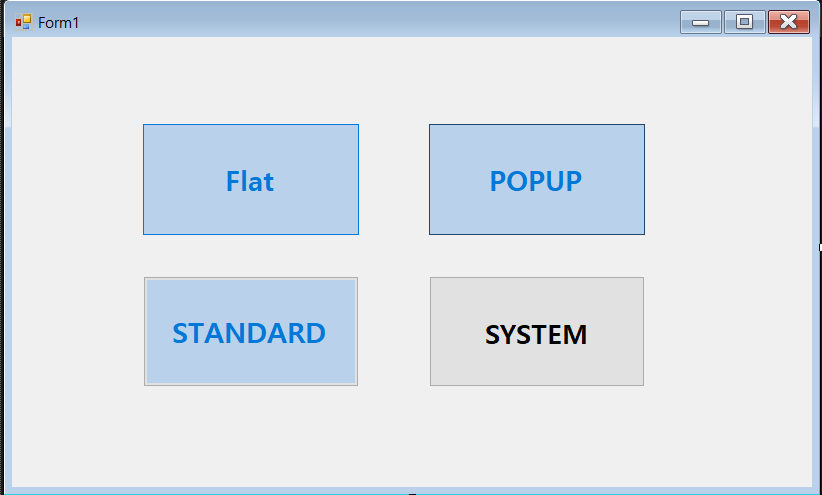
using System;
using System.Collections.Generic;
using System.ComponentModel;
using System.Data;
using System.Drawing;
using System.Drawing.Text;
using System.Linq;
using System.Text;
using System.Threading.Tasks;
using System.Windows.Forms;

namespace ButtonTest
{
    public partial class Form1 : Form
    {
        protected int a,b,c,d = 0;
        public Form1()
        {
            InitializeComponent();
        }

        private void Form1_Load(object sender, EventArgs e)
        {
            label1.Text = "";
        }

        private void btnFlat_Click(object sender, EventArgs e)
        {

            label1.Text = FlatStyle.Flat.ToString();
            if (a % 2 == 0)
            {
                btnFlat.Text = "바꿔엇당";
                a++;
            }
            else if (a % 2 == 1)
            {
                btnFlat.Text = "Flat";
                a++;
            }
        }

        private void btnPopup_Click(object sender, EventArgs e)
        {
            label1.Text = FlatStyle.Popup.ToString();
            if (b % 2 == 0)
            {
                btnPopup.Text = "바꿔엇당";
                b++;
            }
            else if (b % 2 == 1)
            {
                btnPopup.Text = "Popup";
                b++;
            }
        }

        private void btnStandard_Click(object sender, EventArgs e)
        {
            label1.Text = FlatStyle.Standard.ToString();


            if (c % 2 == 0)
            {
                btnStandard.Text = "바꿔엇당";
                c++;
            }
            else if (c % 2 == 1)
            {
                btnStandard.Text = "Standard";
                c++;
            }
        }

        private void btnSystem_Click(object sender, EventArgs e)
        {
            label1.Text = FlatStyle.System.ToString();

            label1.Text = "System";
            if (d % 2 == 0)
            {
                btnSystem.Text = "바꿔엇당";
                d++;
            }
            else if(d%2==1)
            {
                btnSystem.Text = "System";
                d++;
            }
        }
    }
}


버튼 이름 줄 때 항상 대문자로 준다.
탭 인덱스도 조절가능.
C# BtnSystem -> Pascal 표기법 *
btnSystemJump -> Camel 표기법
btn_System -> 언더바
체크박스

using System;
using System.Collections.Generic;
using System.ComponentModel;
using System.Data;
using System.Drawing;
using System.Linq;
using System.Text;
using System.Threading.Tasks;
using System.Windows.Forms;

namespace CheckBox
{
    public partial class Form1 : Form
    {
        public Form1()
        {
            InitializeComponent();
        }
        //private string strTemp;
        /*private void UpdateLabel1(string s, bool b)
        {
            if(b)
            {
                label1.Text += s+" ";

            }
            else
            {
                strTemp = label1.Text;
                int i = strTemp.IndexOf(s.Substring(0, 1));
                int j = i + s.Length+1;
                label1.Text = strTemp.Remove(i, j - i);
                //첫글자 위치 찾아서 글자 길이만큼 자른다.
            }
        }*/
        private void UpdateLabel1()
        {
            string strchk1 = "", strchk2 = "", strchk3 = "", strchk4 = "";
            if (checkBox1.Checked) strchk1 = checkBox1.Text;
            else strchk1 = "";
            if (checkBox2.Checked) strchk2 = checkBox2.Text;
            else strchk2 = "";
            if (checkBox3.Checked) strchk3 = checkBox3.Text;
            else strchk3 = "";
            if (checkBox4.Checked) strchk4 = checkBox4.Text;
            else strchk4 = "";

            label1.Text = strchk1 +" " + strchk2 +" "+ strchk3 +" "+ strchk4;
        }
        private void checkBox1_CheckedChanged(object sender, EventArgs e)
        {
            //label1.Text = checkBox1.Text;
            //UpdateLabel1(checkBox1.Text,checkBox1.Checked);
            UpdateLabel1();
        }

        private void checkBox2_CheckedChanged(object sender, EventArgs e)
        {
            //UpdateLabel1(checkBox2.Text,checkBox2.Checked);
            // label1.Text = checkBox2.Text;
            UpdateLabel1();
        }

        private void checkBox3_CheckedChanged(object sender, EventArgs e)
        {
            //UpdateLabel1(checkBox3.Text,checkBox3.Checked);
            //label1.Text = checkBox3.Text;
            UpdateLabel1();
        }

        private void checkBox4_CheckedChanged(object sender, EventArgs e)
        {
            //UpdateLabel1(checkBox4.Text,checkBox4.Checked);
            //label1.Text = checkBox4.Text;
            UpdateLabel1();
        }

        private void Form1_Load(object sender, EventArgs e)
        {
            label1.Text = "좋아하는 과일 : ";
        }
    }
}
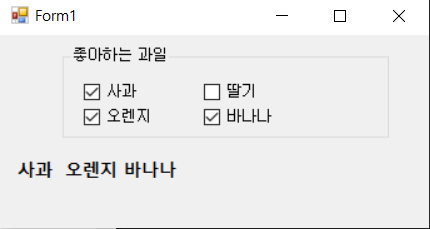
두 가지 방법이 있다. 하나는 문자열을 그대로 가져와서 문자열 첫글자의 인덱스를 찾고 문자열의 길이를 빼서 체크가 해제 되었을 때, 해당 텍스트가 삭제되도록 하고, 또 하나는 문자열을 그대로 들고와서 붙여넣는 방법이다.
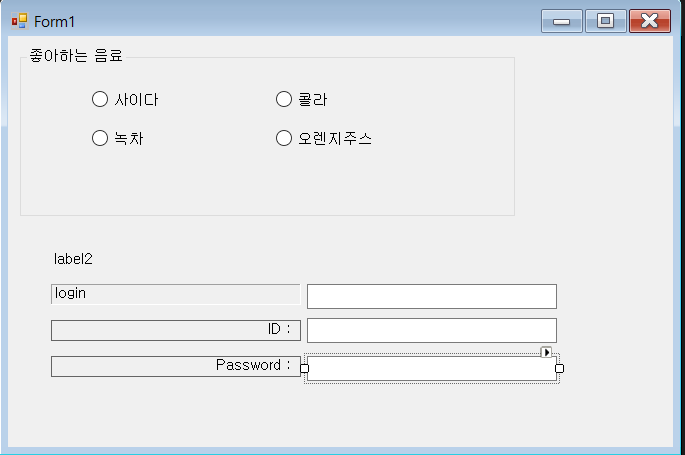
라디오 버튼
- 주어진 항목들 중에서 오직 한 개만을 선택할 수 있는 컨트롤
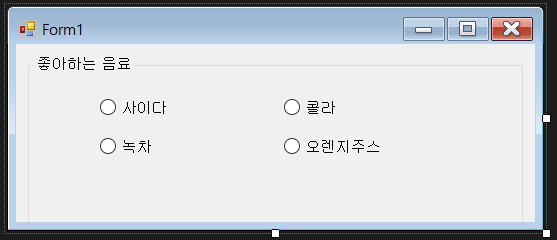
using System;
using System.Collections.Generic;
using System.ComponentModel;
using System.Data;
using System.Drawing;
using System.Linq;
using System.Text;
using System.Threading.Tasks;
using System.Windows.Forms;

namespace RadiobuttonTestApp
{
    public partial class Form1 : Form
    {
        public Form1()
        {
            InitializeComponent();
        }

        private void radioButton3_CheckedChanged(object sender, EventArgs e)
        {
            label1.Text = radioButton3.Text;
        }

        private void radioButton1_CheckedChanged(object sender, EventArgs e)
        {
            label1.Text = radioButton1.Text;
        }

        private void radioButton2_CheckedChanged(object sender, EventArgs e)
        {
            label1.Text = radioButton2.Text;
        }

        private void radioButton4_CheckedChanged(object sender, EventArgs e)
        {
            label1.Text = radioButton4.Text;
        }

        private void groupBox1_Enter(object sender, EventArgs e)
        {

        }

        private void Form1_Load(object sender, EventArgs e)
        {
            label1.Text = string.Empty;
        }
    }
}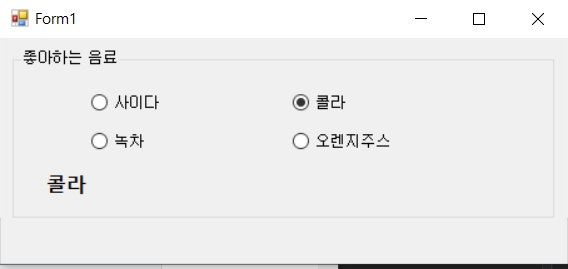

레이블
각종 정보를 폼에 표시할 때 사용하는 컨트롤
레이블의 용도
1. 폼에 있는 컨트롤을 식별하는 정보를 표시
2. 애플리케이션의 실행에 대한 응답 정보를 표시
3. 특정 컨트롤을 클릭했을 때 실행되는 작업을 설명하는 메시지를 표시.

레이블의 프로퍼티 : Font, BorderStyle(테두리스타일 ), TextAlign(글짜 위치 정렬, 중간 오왼위밑)
링크 레이블
- 하이퍼링크를 설정할 수 있는 레이블 컨트롤
- 레이블 콘트롤을 상속받았기 때문에 레이블의 기본적인 기능을 모두 가지고 있음.
- 링크 레이블은 링크를 클릭했을때 발생하는 LinkClicked 이벤트에 대한 이벤트 처리기를 작성
이벤트 처리를 위해서는 Process 클래스의 정적 메소드인 Start() 메소드를 사용함

 private void linkLabel1_LinkClicked(object sender, LinkLabelLinkClickedEventArgs e)
        {
            Process.Start(linkLabel1.Text);
        }   //alt+enter를 눌러서 네임스페이스 추가 가능
텍스트 박스
사용자가 직접 텍스트를 입력할 수 있는 기본적인 컨트롤로서 사용자로부터 값을 입력 받거나 애플리케이션의 실행 결과를 출력하고자 할 때 유용하게 사용할 수 있음.

노말 - 패스워드(*로 출력) -멀티라인
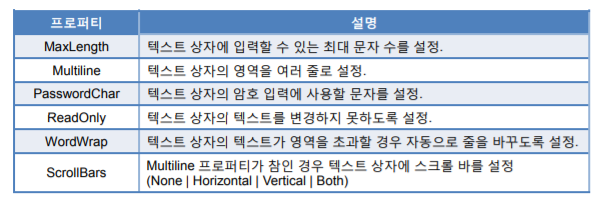

using System;
using System.Collections.Generic;
using System.ComponentModel;
using System.Data;
using System.Drawing;
using System.Linq;
using System.Text;
using System.Threading.Tasks;
using System.Windows.Forms;

namespace TextBoxTest
{
    public partial class Form1 : Form
    {
        public Form1()
        {
            InitializeComponent();

        }
        string teststring1,teststring2;

        private void button1_Click(object sender, EventArgs e)
        {

            //textBox3.Text = "아이디 : " + textBox1.Text + " \r\n비밀번호 :" + textBox2.Text;
            textBox3.Text = $"아이디 : {textBox1.Text} \n 비밀번호 : {textBox2.Text}";

            //admin의 대소문자 구분을 없이 대문자만 출력.
            if((textBox1.Text.ToUpper() == "ADMIN") && (textBox2.Text.ToUpper() == "P@SSW0RD!"))
            MessageBox.show("관리자 로그인");
        }
    }
}
처음 두개의 박스에는 MaxLength와
세번째 텍스트 박스는 MultiLine에 Yes를 해줘야 저렇게 늘어난다. 버튼이 클릭되면 위의 textbox1,2에 있는 내용이 textbox3에 출력된다.

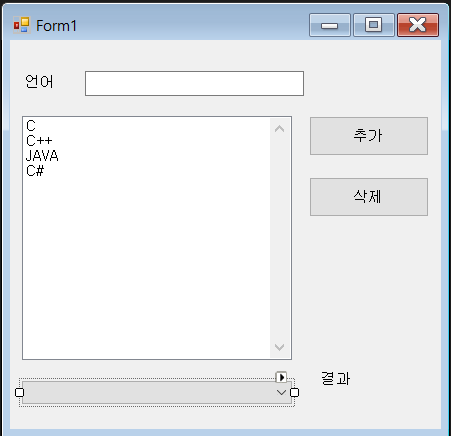
리스트
리스트 기반 컨트롤
- ListControl 클래스를 상속받은 컨트롤을 가리킴
리스트 기반 컨트롤의 종류
- 리스트 상자
- 콤보 상자
- 체크리스트 상자
리스트 기반 컨트롤의 기본적인 형태

리스트 상자
- 사용자가 선택할 수 있는 항목들의 목록을 표시해 주는 컨트롤
- 리스트 상자의 프로퍼티
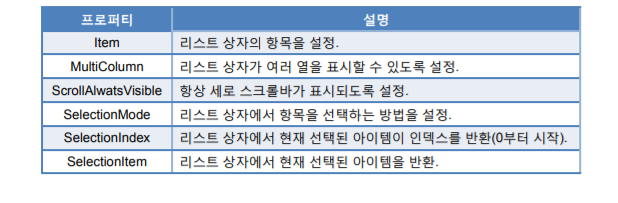
리스트 상자의 항목을 선택하는 방법
- SelectionMode 프로퍼티 값에 따라 변경
- SelectionMode 열거형

리스트 상자의 항목
- Items 프로퍼티를 통하여 추가 및 삭제 가능
문자열 컬렉션 편집기
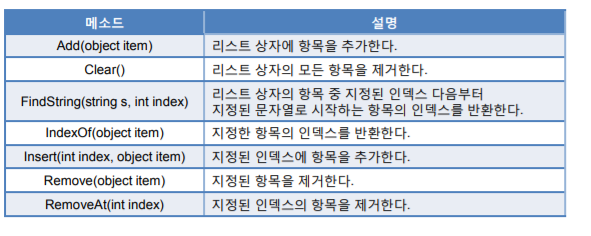
ObjectCollection 클래스 메소드
ObjectionCollection 클래스의 메소드
using System;
using System.Collections.Generic;
using System.ComponentModel;
using System.Data;
using System.Drawing;
using System.Linq;
using System.Text;
using System.Threading.Tasks;
using System.Windows.Forms;

namespace testList
{
    public partial class Form1 : Form
    {
        public Form1()
        {
            InitializeComponent();
        }

        private void button1_Click(object sender, EventArgs e)
        {
            if(textBox1.Text!= "")
            {
                listBox1.Items.Add(textBox1.Text);
                comboBox1.Items.Add(textBox1.Text);
                textBox1.Text = "";

            }
            textBox1.Focus();
        }

        private void button2_Click(object sender, EventArgs e)
        {
            if (listBox1.SelectedIndex > -1)
            {
                listBox1.Items.RemoveAt(listBox1.SelectedIndex);
            }
        }

        private void Form1_Load(object sender, EventArgs e)
        {

        }

        private void comboBox1_SelectedIndexChanged(object sender, EventArgs e)
        {
            label2.Text = comboBox1.SelectedItem.ToString();
        }
    }
}

체크 리스트 상자
- 리스트 상자의 항목에 체크 상자를 추가한 형태의 컨트롤
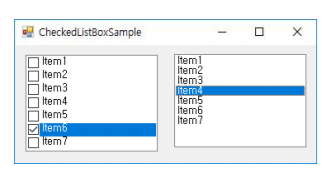
체크 리스트 상자의 프로퍼티
리스트 상자와 대부분 동일 CheckOnClick 프로퍼티가 추가됨.
항목을 클릭했을때 체크 상자에 ‘✔ ’ 표시가 나타나도록 설정.
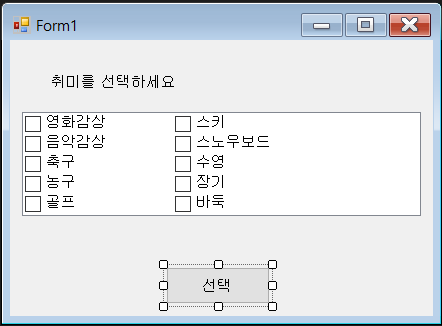
using System;
using System.Windows.Forms;

namespace CheckListBoxApp
{
    public partial class Form1 : Form
    {
        public Form1()
        {
            InitializeComponent();
        }

        private void button1_Click(object sender, EventArgs e)
        {
            //동적 변수 뒤에 값을 넣는 순간 자동으로 자료형을 지정해준다.
            var strTemp = "";
            foreach (var item in checkedListBox1.CheckedItems)
            {
                strTemp += item.ToString();
                strTemp += " ";
            }
            MessageBox.Show($"당신의 취미는 {strTemp}입니다", "확인",MessageBoxButtons.OK,MessageBoxIcon.Information);
        }
    }
}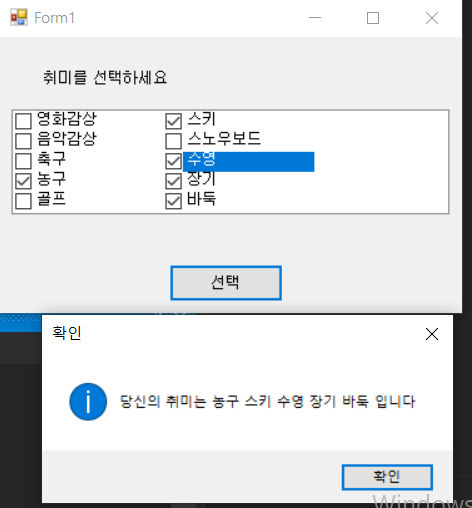
대화상자
대화상자의 용도
-사용자와 애플리케이션간의 교량 역할 .
주로 소량의 데이터를 입출력하기 위한 수단.
-대화상자의 생성방법 모달(modal)
-대화상자 모덜리스(modeless)
대화상자 대화상자의 종류
메시지 대화상자
-사용자에게 간단한 메시지 표현.
공통 대화상자 윈도우 운영체제에서 기본적으로 제공.
-열기, 저장, 글꼴, 색, 인쇄, 페이지 설정 등.


//폼 1번~~~

using System;
using System.Windows.Forms;

namespace Dialogboxtest
{
    public partial class Form1 : Form
    {
        public Form1()
        {
            InitializeComponent();
        }

        private void button1_Click(object sender, EventArgs e)
        {
            Form2 form = new Form2();
            form.ShowDialog(); //모달팝업
            //form.Show();//모달리스
        }
    }
}
폼 2번~~~~ using System; using System.Windows.Forms; namespace Dialogboxtest { public partial class Form2 : Form { public Form2() { InitializeComponent(); } private void button1_Click(object sender, EventArgs e) { Close(); } } }1번에서 버튼 누르면 2번 폼을 부른다. form.ShowDialog()로 부르면 모달 form.show() 로 부르면 모달리스

모달로 부르면 폼2번이 떠있는동안 닫기 전까지는 아무것도 못한다
메시지 상자
- 사용자에게 간단한 메시지를 전달할 때 사용
- MessageBox 클래스의 멤버인 Show() 메소드 이용
- 12개의 중복된 Show() 메소드 중 기본 형식

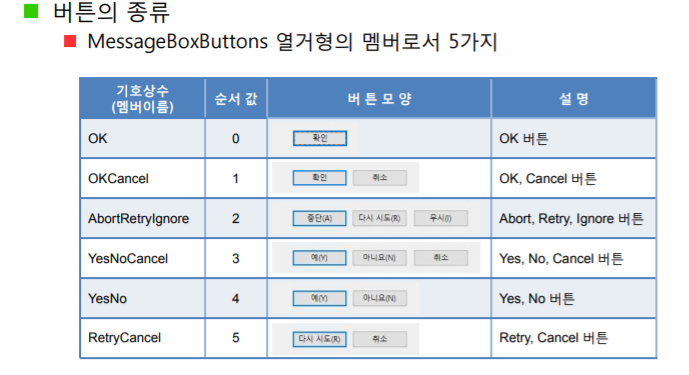

메시지 상자 - 기본 버튼 설정
기본 버튼
- 메시지 상자가 활성화 될 때 초기에 입력포커스를 갖는 버튼
- 기본 버튼을 명시하지 않으면 첫 번째 버튼이 기본 버튼.
기본 버튼 설정 방법
- MessageBoxDefaultButton 열거형 멤버를 매개변수로 갖는 Show() 메소드 이용
Show(message, caption, buttonKind, iconKind, MessageBoxDefaultButton);
공통 대화상자
윈도우 운영체제에서 기본적으로 제공.
정형화된 대화상자
-CommonDialog 클래스의 파생 클래스
-FileDialog OpenFileDialog (파일 열기)
-SaveFileDialog (파일 저장)
-FontDialog (글꼴)
-ColorDialog (색)
-PrintDialog (인쇄)
-PageSetupDialog (페이지 설정)
-FolderBrowserDialog (폴더 탐색/생성)
위 프로퍼티 사용해서 메모장을 만들 수 있다.
열기 대화 상자
- 드라이브, 폴더, 파일 확장자를 설정하여 원하는 형식의 파일을 찾을 수 있는 기능 제공
OpenFileDialog 컴포넌트의 주요 프로퍼티

FileName 과 FileNames 만 사용
필터라는 기능을 써서 쓰고자하는 확장자만 찾는다.
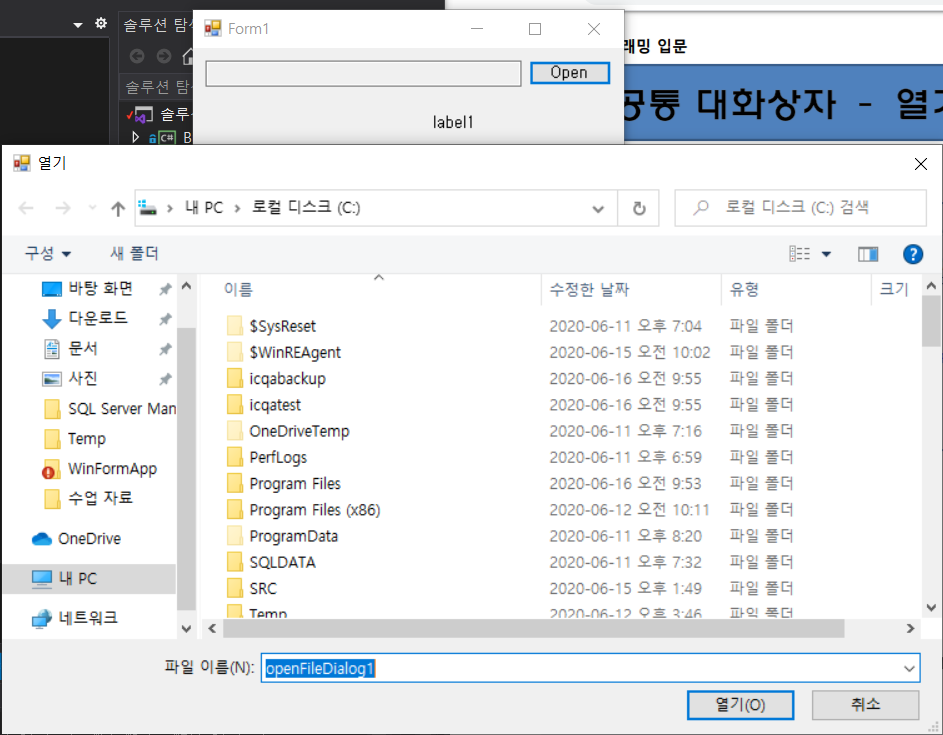
 private void button1_Click(object sender, EventArgs e)
        {
            openFileDialog1.ShowDialog();


        }
요것만 실행하면 위와 같이 나온다. OpenFileDialog를 꼭 추가한다.
openFileDialog1.Filter = "모든파일(*.*)|*.*";//
private void button1_Click(object sender, EventArgs e)
        {
            openFileDialog1.FileName = "";
            openFileDialog1.InitialDirectory = @"C:\"; //찾기 시작할 위치 지정
            openFileDialog1.Filter = "텍스트 파일(*.txt)|*.txt";//파일 확장자 지정
            openFileDialog1.FilterIndex = 1;
            openFileDialog1.RestoreDirectory = true;
            openFileDialog1.Multiselect = true; //프로퍼티 창에서도 가능
            openFileDialog1.ShowDialog();
            foreach(string strTmp in openFileDialog1.FileNames)
            {
                textBox1.Text += strTmp;
                textBox1.Text += Environment.NewLine;
            }

        }
공통 대화상자 (색 대화상자)
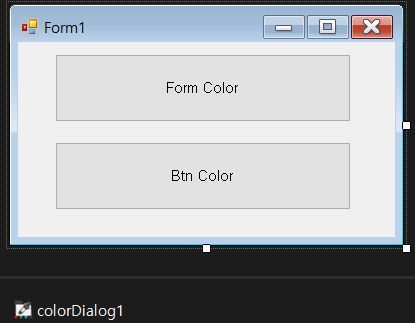
using System;
using System.Drawing;
using System.Windows.Forms;

namespace ColorDialog
{
    public partial class Form1 : Form
    {
        public Form1()
        {
            InitializeComponent();
        }

        private void button1_Click(object sender, EventArgs e)
        {
            if(colorDialog1.ShowDialog()==DialogResult.OK)
            {
                this.BackColor = colorDialog1.Color;
            }
        }

        private void button2_Click(object sender, EventArgs e)
        {
            if (colorDialog1.ShowDialog() == DialogResult.OK)
            {
                button1.BackColor = colorDialog1.Color;
                button2.BackColor = colorDialog1.Color;
            }


        }
    }
}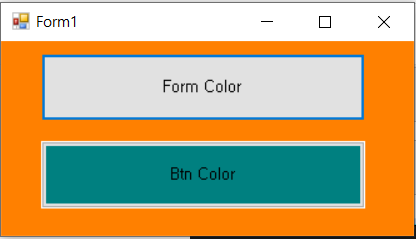
'C#' 카테고리의 다른 글
C# 고급 컨트롤 (0) 2020.06.17 C# 고급폼 (2020.06.16) (0) 2020.06.16 C# 윈폼 계산기 (0) 2020.06.15 C# 윈폼 (2020.06.15) (0) 2020.06.15 C# GitHub, 제네릭, 애트리뷰트, 예외, 스레드 (2020.06.15) (0) 2020.06.15